How To Take A Screenshot On iPhone X/iPhone 11/iPhone 12
The iPhone series remains the best-selling and top-favorite smartphone in the world. Every product of Apple, which is just newly released, always makes a fever globally because of its stunning features, brand-new technology, and high class. iPhone XS is not an exception.
All products of the iPhone series are made minimally following the spirit of their “father” Steve Job. Therefore, you can do all the things on this phone with just one hand. However, there are some different features and technologies added to the newest products, which may cause a few difficulties for users.
Our writing will guide you on how to take a screenshot on iPhone X/XS, even iPhone 11/iPhone 11 Pro/ iPhone 11 Max, and iPhone 12 in the best and easiest way. (Now, we are going to share with you the way to take a screenshot on iPhone XS with the best and easiest guide. )Since this is the most different product compared to earlier smartphones such as iPhone 6s, iPhone 7, etc., the way we take a screenshot is also different.
What Way Can You Take a Screenshot on iPhone?
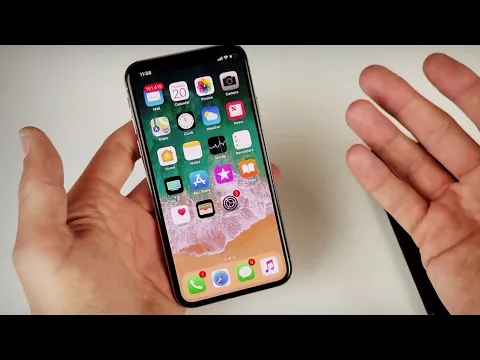
Capture Screen on iPhone x and the newest
iPhone XS has no HOME button, and that is a big difference. There is just a small bar at the bottom for you to make the navigation gestures by swiping up, down, left, and right. On iPhone 8 or earlier, there is a physical or touch Home button instead.
Taking a screenshot of the old version of iPhones is also simple.
Take a screenshot on iPhone 8 and earlier version
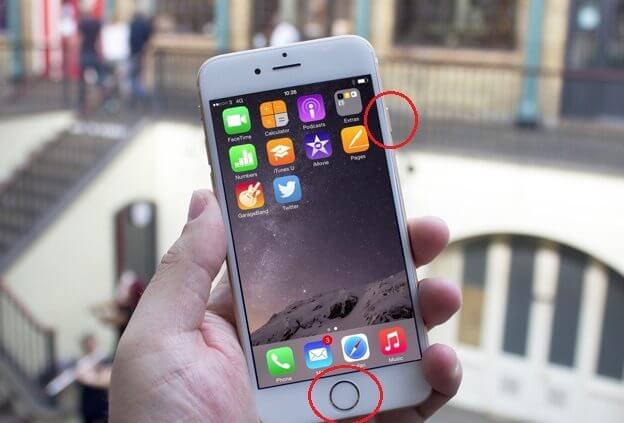
STEP 1: Press the Side button (or the top button for iPhone 5s and earlier)
STEP 2: Quickly press the Home button, while holding the Side key until there is a flash on the screen or a shutter sound (when your phone’s in normal mode). Then, release all the buttons.
STEP 3: Now you have a small image at the left-bottom corner of the screen with three options: share the picture, edit the picture, or discard it.
To share the picture, click and hold it. To edit the image, touch it and add text or drawings with Markup. To discard the picture, swipe left, and it will disappear.
After taking a screenshot, the pictures are saved in the album “Screenshots”. Access “Photo”, then find the images that you’ve just created in “Screenshots”.
1. Using Physical Buttons
Our following share will show you two ways to take a screenshot on iPhone XS and iPhone 11/iPhone 11 Pro/ iPhone 11: Using physical buttons and using Assistive touch. Both are easy and simple. Let’s see how to work with the physical buttons first.
STEP 1: Press the Side buttons (including the Volume buttons and Lock button)
On the side of the phone, you can see two buttons for Volume and we can use both. The lock button is a bit bigger and is placed on the right side, while the Volume ones are located on the left side. Now, hold one Volume button, while quickly pressing the Lock key at the same time.
STEP 2: Release the buttons
Hold for 1 or 2 seconds until there is a flash on the screen or a shutter sound, then release all the buttons. You will see a small picture at the left-bottom corner of the screen, and it is a screenshot you’ve just taken.
STEP 3: Do some tasks with the screenshot
Similarly, you also have the options like in iPhone 8 or the older versions that we have mentioned above.
To dismiss the picture, swipe left; to share the photo, click and hold it; to edit the photo, click and use Markup to add text and drawings.
Note: If you don’t do anything with the screenshot after taking it, it will be sent to album “Screenshots” after a few seconds.
2. Take A Screenshot On iPhone Using Assistive Touch
Most people like using Assistive Touch and we do, too. It protects the physical buttons from being used too much as those buttons will no longer be sensitive when we keep pressing them many times. Assistive touch also shows us many gestures and tasks that we don’t have to find in Settings. So, how to take a screenshot by using Assistive touch?
STEP 1: Enable Assistive touch
Follow this step to find and enable Assistive touch:
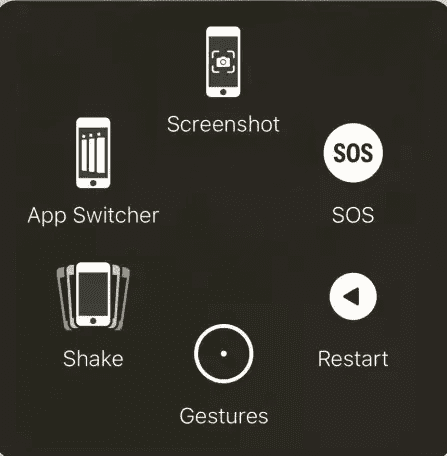
Open Settings, access General, and find Accessibility. In this list, search for Assistive touch and turn it on. After this step, you will see a blur white round on the screen, which is called a virtual touch.
STEP 2: Take a screenshot
Click Assistive touch; then a menu will show up with many options to choose from. Click the screenshot to take a picture.
STEP 3: Do some tasks with the screenshot
This step is the same as STEP 3 above when using the physical buttons to take a screenshot.
In brief, you can see both ways of taking a screenshot are very simple and easy. Some people prefer Assistive touch, but some think using physical buttons is faster and quicker.
Read also: How to Take a Screenshot on iPhone 7, 7 Plus and Older
In conclusion
Now you know how to take a screenshot on iPhone 12/x/11. It is a little bit different for Apple fans, but if you have used other smartphones, this method is not so different. Stay tuned for more tricks, tips.