How to Delete Screenshots on MacBook Computers?

For those who are new to the world of Mac, you might have noticed that there’s no PrintScreen button for taking screenshots like on Windows computers. This can be a bit frustrating for beginners who aren’t familiar with the keyboard shortcuts used for capturing screenshots on a Mac.
If you’re starting with using screenshots, you may be asking yourself why they’re even necessary and how exactly you go about capturing them on your MacBook.
In this blog post, we’ll delve into not only how to delete these captured images from your MacBook but also explore why they’re essential and discuss various methods of obtaining them on your Mac device.
Key takeaway: How to Delete Screenshots on Macbook
- Open the Screenshots folder: Go to Finder > Pictures > Screenshots. Then drag and drop any screenshots you want to delete to the Trash.
- Use keyboard shortcut: Hit Shift + Command + Control + 4. This will bring up a thumbnail preview of all your screenshots. Select the screenshots you want to delete, then hit the Delete key to send them to the Trash.
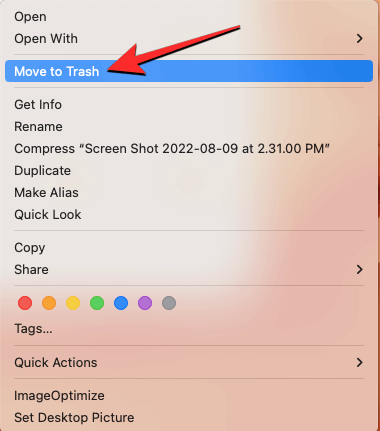
- Delete from Preview: Open the screenshot you want to delete in the Preview app. Go to File > Move to Trash. This will delete the screenshot.
- Use Finder search: In Finder, type “screenshots” in the search bar. This will show all screenshots on your Mac. You can then sort through them and drag any you want to delete to the Trash.
- Use Time Machine: If you deleted a screenshot a while ago but want to retrieve it, you may be able to recover it from a Time Machine backup. Open Time Machine, enter the Screenshots folder and search through previous versions.
The screenshots will sit in the Trash for 30 days before being permanently deleted, giving you a grace period in case you change your mind. Remember to empty the Trash periodically to free up disk space.
So Why Are Screenshots Important?
To put it simply, screenshots serve as an excellent tool for preserving helpful or informative content in image form while providing an effortless way to share such information.
You can take these snapshots not only on computers but also on mobile devices like iPhones. However, if you find that you’ve accumulated too many screenshots or other images on your iPhone, you might be wondering how to delete all photos from iPhone or Macbook to free up storage space.
Screenshots play a crucial role when creating user guides or tutorials since they allow one to capture either the entire screen or specific sections of it.
Whether it’s images, audio clips or video recordings of what’s happening on your screen – all these types of ‘screenshots’ can be taken depending upon what suits your needs best.
Let’s say you happen to be an educator or student. Incorporating image-based screenshots into academic resources could simplify complex concepts, making them easier for learners to grasp.
Video-based captures come in handy, especially for gaming enthusiasts who wish to record snippets of their gameplay sessions, which could then be shared within online forums or amongst friends – just one among many potential use cases.
Understanding the Art of Screenshot Capture

The method you employ to capture a screenshot is largely dependent on its intended use. If you’re using a Mac, several keyboard shortcuts can assist in capturing your screen in various ways.
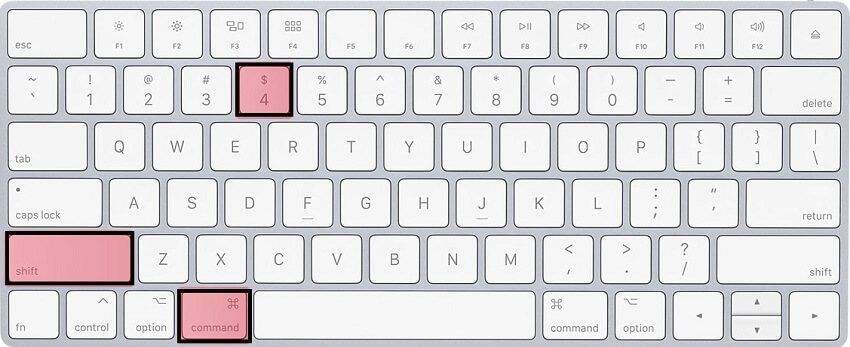
At the most basic level, to capture the entirety of your screen, simultaneously press Command + Shift + 3. To capture a specific area, drag crosshairs while pressing Command + Shift + 4.
Locating Your Stored Screenshots on Mac
Once you’ve successfully captured your desired screenshot, it’s time to save it onto your local drive. By default, screenshots taken on Mac are saved directly onto the desktop.
However, if you’re running the latest version of macOS, these screenshots will find their home in their unique stack created specifically for them on the desktop.
Screenshots serve as important tools when needed but often become redundant after they’ve served their purpose. These small files may only be used once or for limited purposes and tend to accumulate over time if not properly managed.
Each screenshot consumes about 4 megabytes of storage space, which can quickly add up if left unchecked. Therefore, deleting unnecessary screenshots either manually or by utilizing cleanup tool software becomes essential.
How to Manually Delete Screenshots on Macbook

Before proceeding with the deletion process, first locate where these screenshots have been stored. The location typically depends upon which version of macOS is currently installed on your device.
All available screenshots located within the desktop can easily be found by clicking Stack. Now, let’s delve into how exactly one goes about deleting these superfluous screenshots from your Mac.
When you need to erase just one screenshot on your Mac computer, it’s as simple as selecting the file and dragging it into the trash folder.
If you’re more of a keyboard shortcut person (like me), press down the Control + Click keys simultaneously and move that pesky file straight to the digital dumpster.
Now, if you’ve got an army of screenshots cluttering up your desktop (we’ve all been there), don’t fret! You can select multiple files at once by clicking and dragging over them until they’re highlighted.
Once they’re selected, drag them en masse into your Trash folder. It’s like spring cleaning for your Mac!
If you have screenshots scattered across different folders on your MacBook, then this step is for you. You’ll have to navigate each location individually and remove those sneaky screenshots from their hiding places.
And remember – after deleting these files, always empty out that trash bin. Otherwise, you won’t free up the space that these screenshots were taking.
Let’s face it: Manual deletion can be tedious work. Plus, there’s always the risk of accidentally losing important data in the process – I’ve learned this lesson the hard way.
Make sure to back up any crucial data onto an external drive or remote location before proceeding with any automated file deletion, especially when dealing with images, even if it’s just screenshots.
The Bottom Line
In conclusion, while screenshots are incredibly useful for storing and sharing information quickly via email or messaging apps, they’re also notorious space hogs.
So, it’s always a good idea to regularly delete these files to keep your Mac running smoothly and efficiently. After all, an optimized Mac is a happy Mac.
