How to Take a Screenshot on Moto G Power (4 Ways)
Taking screenshots is an essential skill for any smartphone user. Screenshots are convenient to save information, troubleshoot issues, or share with friends. The Moto G Power makes capturing screenshots simple and quick with some easy built-in options. This guide will teach you the various ways to take a screenshot on Moto G Power.
About Moto G Power
The Moto G Power from Motorola is a popular budget smartphone with excellent battery life. With a large 5000mAh battery, the Moto G Power can last days on a single charge. The Moto G Power runs a clean version of Android and has a 6.4-inch display, triple rear cameras, and solid performance.
How to Take Screenshot on Moto G Power
Taking screenshots on the Moto G Power only requires simple built-in key combinations or gestures. Here are the main ways to capture screenshots:
1#. Use the Power and Volume Down Buttons
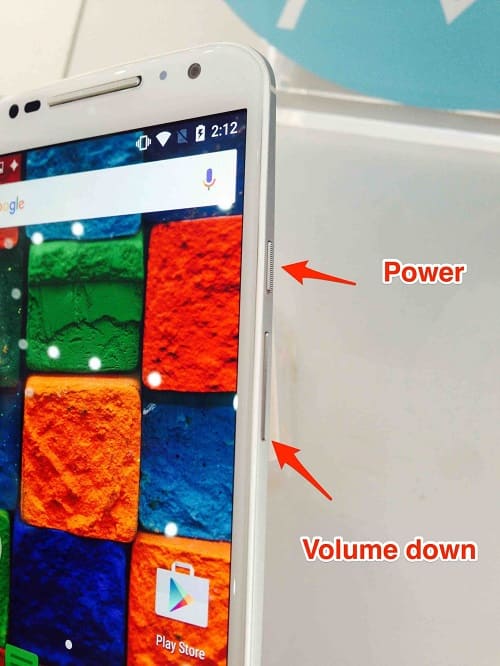
The easiest and most universal way to take a screenshot on Moto G Power is by simultaneously pressing the Power and Volume Down buttons.
Hold both buttons simultaneously for 2-3 seconds until the screenshot animation flashes across the screen. Then you’ll get a preview thumbnail in the corner and a notification confirming it is saved.
This method works from anywhere in the phone’s system or apps. It’s reliable and straightforward. The screenshot will save directly to the Photos app for easy sharing or editing.
2#. Use Three Finger Gesture
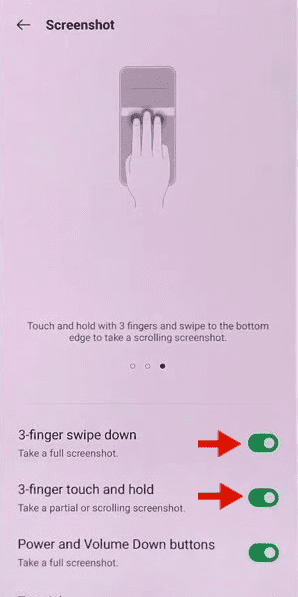
The Moto G Power supports a handy three-finger gesture for a quicker way to take screenshots. To enable this:
- Go to Settings > System > Gestures
- Toggle on “Swipe to take screenshot“
You can take a screenshot anytime by placing three fingers on the screen and swiping it down. This gesture is fast and straightforward once enabled. It also works universally across the Moto G Power’s interface.
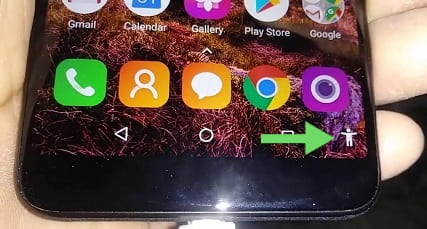
3#. Use Screenshot Shortcut from Quick Settings
There is also a screenshot shortcut available from the Quick Settings shade. Here’s how to access it:
- Swipe down from the top to open Quick Settings
- Look for the Screenshot icon (it looks like a mini screenshot)
- Tap the icon to capture a screenshot immediately
This shortcut in Quick Settings makes it fast to take screenshots without fumbling for buttons. Keep in mind this method only works from the Quick Settings shade specifically.
Here is how to take a screenshot on a Moto G Power using the Accessibility Menu:
Using the Accessibility Menu
The Moto G Power runs Android, which has an Accessibility Menu that can be enabled in the device settings. This menu provides additional functions for controlling your device, including taking screenshots.
To enable the Accessibility Menu on the Moto G Power:
- Open Settings and go to Accessibility.
- Scroll down and tap “Accessibility Menu.”
- Toggle the switch on to enable the Accessibility Menu.
Once enabled, you can access the Accessibility Menu by pressing both volume keys together for a few seconds. This will bring up a menu overlay with various options.
Take a screenshot using the Accessibility Menu:
- Bring up the Accessibility Menu by pressing the Volumes Up and Down keys simultaneously for 2-3 seconds.
- In the menu overlay, tap “Take screenshot.“
- The screenshot will be captured, and you’ll see the thumbnail preview.
- Tap the preview to edit or save the screenshot.
The Accessibility Menu provides an alternative way to take screenshots if you have trouble pressing the Power and Volume Down buttons. It also makes taking multiple screenshots easier since the menu stays on the screen.
Just remember to enable Accessibility Menu in the Moto G Power’s settings first before using this method. The volume key shortcut won’t work otherwise.
Screenshot Previews and Editing
After you take a screenshot using any method, you’ll get a popup thumbnail preview in the corner. Tap the preview to edit or draw on your screenshot before saving the final image. The built-in screenshot editor on the Moto G Power lets you crop, add text, doodle, highlight, and more.
The screenshot will be saved automatically once you exit the editor. You’ll also be notified when the screenshot is saved to the Photos app.
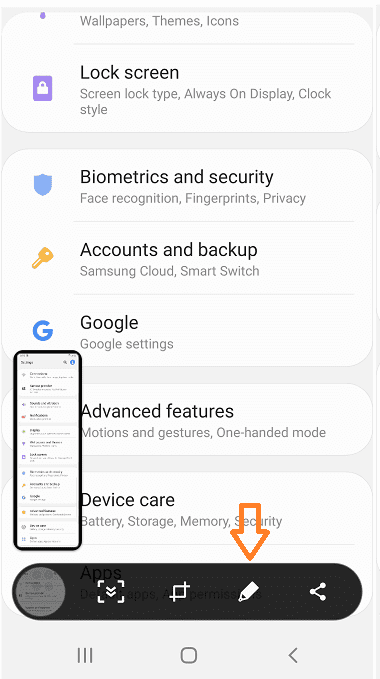
Customize Your Moto G Power Screenshots
If you want more control over your screenshots, dive into the settings menu. Go to Settings > Display > Advanced > Screenshot settings. Here you’ll find options like:
- Changing the screenshot file format between PNG and JPG
- Hiding status and navigation bars in your screenshots for clean captures
- Toggling screenshot sound on/off
Play around with these settings to customize the way your Moto G Power’s screenshots work.
Troubleshooting Screenshot Problems
Sometimes, you may run into issues taking or saving screenshots on the Moto G Power. Here are some troubleshooting tips:
- Make sure storage isn’t full. Screenshots take up storage space and won’t save if your phone’s memory is ultimately used up. Delete some unneeded files.
- Check that the screenshot settings aren’t disabled. Go to the Screenshot settings and ensure “Take screenshot” isn’t turned off.
- Do a soft reset by holding the Power button and Volume Up key together for 10+ seconds. This will restart your phone and refresh the screenshot processes.
- Update to the latest software version for your Moto G Power if available. Updates sometimes fix screenshot bugs.
Conclusion
Taking a screenshot on Moto G Power is easy with its simple built-in tools. Just remember these options:
- Press Power + Volume Down
- Three-finger swipe gesture
- Use the Screenshot tile in Quick Settings
Customize aspects in the Screenshot settings section. Troubleshoot issues by checking storage, settings, doing resets, and updating software. With these tips, you’ll master the Moto G Power screenshot skills quickly!
Read more: